ffmpeg x264 x265

コーデックの指定

:CPU H264 : -vcodec libx264
:CPU H265 : -vcodec libx265
:Nvidia H264 : -vcodec h264_nvenc
:Nvidia H265 : -vcodec hevc_nvenc

downloadしながら再生に対応

-movflags +faststart

参考
http://tech.ckme.co.jp/ffmpeg_h264.shtml

ソフトウェアエンコードとGPUを利用したハードウェアエンコードの差が激しい
速度的には、圧倒的にハードウェアエンコードだが、ファイルサイズ的には、圧倒的にソフトウェアエンコードが有利という結果に。
どちらをメインで使うか悩んでしまう結果となった。
要約すると下記表の通り

h264 h265
速度 ファイルサイズ 速度 ファイルサイズ
cpu 8.6x 81.9MB 2.5x 46.1MB
gpu 11.5x 380.7MB 11.5 381MB

Machine
CPU Xeon E5-2687W SMP PowerLimit 80%
MEM 64GB
GPU GTX-1080
OS Windows 10.0.17134.228
FFMPEG 4.0.2

source file

Stream #0:0[0x1003]: Video: mpeg2video (Main) ([2][0][0][0] / 0x0002), yuv420p(tv, bt709, top first), 720x480 [SAR 32:27 DAR 16:9], 29.97 fps, 29.97 tbr, 90k tbn, 59.94 tbc
Stream #0:1[0x1043]: Audio: aac (LC) ([15][0][0][0] / 0x000F), 48000 Hz, stereo, fltp, 256 kb/s

h264 cpu encoding 8.6x(9.3x) 81.9MB

ffmpeg -deinterlace -dual_mono_mode main -i test.ts -vcodec libx264 -movflags +faststart test.cpu264.mp4

h264 gpu encoding 11.5x 380.7MB

ffmpeg -deinterlace -dual_mono_mode main -i test.ts -vcodec libx265 -movflags +faststart test.cpu265.mp4

h265 cpu encoding 2.5x(3.2x) 46.1MB

ffmpeg -deinterlace -dual_mono_mode main -i test.ts -vcodec h264_nvenc -movflags +faststart test.gpu264.mp4

h265 gpu encoding 11.5x 381MB

ffmpeg -deinterlace -dual_mono_mode main -i test.ts -vcodec hevc_nvenc -movflags +faststart test.gpu265.mp4

Ubuntu 14.04 LTS rsyslog

syslogを1箇所で管理したいため、rsyslogに受信設定を行う。

# diff rsyslog.conf rsyslog.conf.org 
18,20c18,20
< $ModLoad imudp
< $UDPServerRun 514
< $AllowedSender UDP ,127.0.0.1,192.168.10.0/24 --- > #$ModLoad imudp
> #$UDPServerRun 514
> 
22,24c22,24
< $ModLoad imtcp
< $InputTCPServerRun 514
< $AllowedSender TCP, 127.0.0.1.192.168.10.0/24 --- > #$ModLoad imtcp
> #$InputTCPServerRun 514
> 

rsyslog設定を読み直す。

# killall rsyslogd

rtx1200のログを転送する設定

syslog host [rsyslog_host ip address]
syslog facility local6
syslog notice on

転送されたlogは、全て/var/log/syslogに出てくるので、切り分けをする。

mkdir -p /var/log/recived
chown syslog:adm /var/log/recived
# vi 10-reviced.conf
:hostname, isequal, "router.home.local"   /var/log/recived/rtx1200.log
& ~ ← /var/log/syslogに記録したくない為
# killall rsyslogd

切り分けできているか、確認

tail -f /var/log/recived/rtx1200.log
Apr 14 15:50:34 router.home.local [IKE] receive heartbeat message from xxx.xxx.xxx.xxx
Apr 14 15:50:34 router.home.local [IKE] still connected : no message
Apr 14 15:50:34 router.home.local [IKE] receive heartbeat message from xxx.xxx.xxx.xxx
Apr 14 15:50:34 router.home.local [IKE] still connected : no message
Apr 14 15:50:34 router.home.local [IKE] receive heartbeat message from xxx.xxx.xxx.xxx
Apr 14 15:50:34 router.home.local [IKE] still connected : no message

つらつら受信している。
本体ログには、記録されていない。

logrotateの設定
/var/log/recived/*.logが新たに増えたので、logrotateに加える。

cat /etc/logrotate.d/recived
/var/log/recived/*.log {
        weekly
        missingok
        rotate 52
        compress
        notifempty
        create 640 syslog adm
        sharedscripts
}

logrotateはcronで動いているので、cronを再起動

service cron restart

動作確認をする。

logrotate -d /etc/logrotate.d/recived
# logrotate -d /etc/logrotate.d/recived
reading config file /etc/logrotate.d/recived

Handling 1 logs

rotating pattern: /var/log/recived/*.log  weekly (52 rotations)
empty log files are not rotated, old logs are removed
considering log /var/log/recived/rtx1200.log
  log does not need rotating

まだlogが溜まってないから、rotationする必要が無いと。
暫くしたら、rotateしたlogがあるか、確認してみる。

www.club535.com を ssl 対応してみた。

535_sslLet’s Encryptで90日ごとに証明書を更新しないといけないが・・・
一応 httpsで接続出来て、今までの記事が読めることを確認した。

私が使っているさくらインターネットでの契約では、root権限は持てないので、
ローカルで証明書を作成し、さくらインターネットコントロールパネルで登録した。

まず始めにさくらインターネットコントロールパネルで、ドメインの設定を行う。

設定は、
契約情報-契約サービスの確認-サーバの設定-ドメイン設定

トップドメインの設定を変更

  1. wwwを付与せずマルチドメインとして使用する
  2. 新しいドメインの追加でwww.club535.comを登録

let’s encryptをインストールしたのは、Ubuntu 14.04 LTS
git cloneで作成

$ git clone https://github/letencrypt/letsencrypt
$ cd letsencrypt/
$ ./letsencrypt-auto --help all

letencrypt-auto –help all を起動すると、必要なパッケージを自動的にインストールしてくれる。
開発環境を整えていないため、結構な数がインストールされた。
./letsencrypt-auto certonly –manual

mkdir -p .well-known/acme-challenge  
# printf "%s" long_long_code > .well-known/acme-challenge/long_long_code

途中、www.club535.comにファイルを置くよう指示され、そのとおりファイルを置き、続ける。
wwwの持ち主確認が行われるわけですね。
一通り証明書の作成が完了したら、作成された証明書を配置する。
作成されるのは、

 # ls /etc/letsencrypt/live/【Domain name】
 cert.pem chain.pem fullchain.pem privkey.pem
 

privkey.pemをさくらインターネットコントロールパネルでアップロードし、
cert.pemの内容をテキストで貼り付けて完了

あとは、wordpressの設定で

  • wordpress アドレス(URL)
  • wordpress (URL)

をhttpsに変更して完了。

しかし、一部コンテンツに影響があり、cssあたりが読み込めてない感じだ。
追いかけるのが面倒だ。

最初から、httpsで導入すれば問題無いのだろうけど・・・

Ubuntu 14.04.4 LTS apt-cacher-ng install

apt-cacher-ngのインストール

 # apt-get install apt-cacher-ng

apt用のプロキシの設定

 # vi /etc/apt/apt.conf.d/02proxy
Acquire::http::Proxy "http://127.0.0.1:3142/";
Acquire::ftp::Proxy "ftp://127.0.0.1:3142";

クライアントの02proxyは適時サーバーアドレスを書き換える。

http://127.0.0.1:3142にアクセスしてTransfer Statisticsを確認したり、キャッシュの整理が可能
アクセス制限は、security.confに書けばよい。

# vi /etc/apt-cacher-ng/security.conf
AdminAuth: [ID]:[password]

netatmo api で温度取得

netatmo apiを利用してTemperatureを取得したので、自分の備忘として。

phpとpythonでデータ取得を試してみた。

phpでは、battery_vpの取得方法がわからん。

pythonでは、WeatherStationが複数ある場合、個々の取得方法がわからん。

今回は、1拠点のバッテリー数値の取得は、pythonで行い、温度はphpを使った。

netatmoのModule1が外部温度センサーに割り当てられbattery_vpがある。
この数値がイマイチよくわからない

/*for raingauge and outdoor module*/
class NABatteryLevelModule
{
/* Battery range: 6000 … 3600 */
const BATTERY_LEVEL_0 = 5500;/*full*/
const BATTERY_LEVEL_1 = 5000;/*high*/
const BATTERY_LEVEL_2 = 4500;/*medium*/
const BATTERY_LEVEL_3 = 4000;/*low*/
/* below 4000: very low */
}

のように書かれているので、cactiでThresholdsを設定する。
値は、Warnigを4100、Alertを4500とした。

Netatmo-API-PHP

netatmo.php

#!/usr/bin/php
<?php /** * Example of Weather station API * If you need more details, please take a glance at https://dev.netatmo.com/doc */ define('__ROOT__', dirname(dirname(__FILE__))); require_once (__ROOT__.'/src/Netatmo/autoload.php'); require_once 'Utils.php'; require_once 'Config.php'; /** * Prints a list of devices * */ function printDevices($devices, $title = NULL) { if(!is_null($devices) &amp;&amp; is_array($devices) &amp;&amp; !empty($devices)) { if(!is_null($title)) printMessageWithBorder($title); foreach($devices as $device) { printWSBasicInfo($device); } } } $scope = Netatmo\Common\NAScopes::SCOPE_READ_STATION; $config = array("client_id" =&gt; $client_id,
                "client_secret" =&gt; $client_secret,
                "username" =&gt; $test_username,
                "password" =&gt; $test_password);

$client = new Netatmo\Clients\NAWSApiClient($config);

//Authentication with Netatmo server (OAuth2)
try
{
    $tokens = $client-&gt;getAccessToken();
}
catch(Netatmo\Exceptions\NAClientException $ex)
{
    handleError("An error happened while trying to retrieve your tokens: " .$ex-&gt;getMessage()."\n", TRUE);
}

//Retrieve user's Weather Stations Information

try
{
    //retrieve all stations belonging to the user, and also his favorite ones
    $data = $client-&gt;getData(NULL, TRUE);
//    printMessageWithBorder("Weather Stations Basic Information");
}
catch(Netatmo\Exceptions\NAClientException $ex)
{
    handleError("An error occured while retrieving data: ". $ex-&gt;getMessage()."\n", TRUE);
}

if(empty($data['devices']))
{
    echo 'No devices affiliated to user';
}
else
{

    $users = array();
    $friends = array();
    $fav = array();
    $device = $data['devices'][0];
    $tz = isset($device['place']['timezone']) ? $device['place']['timezone'] : "GMT";

    //devices are already sorted in the following way: first weather stations owned by user, then "friend" WS, and finally favorites stations. Still let's store them in different arrays according to their type
    foreach($data['devices'] as $device)
    {

        //favorites have both "favorite" and "read_only" flag set to true, whereas friends only have read_only
        if(isset($device['favorite']) &amp;&amp; $device['favorite'])
            $fav[] = $device;
        else if(isset($device['read_only']) &amp;&amp; $device['read_only'])
            $friends[] = $device;
        else $users[] = $device;
    }

    //print first User's device Then friends, then favorite
    printDevices($users, "User's weather stations");
//    printDevices($friends, "User's friends weather stations");
//    printDevices($fav, "User's favorite weather stations");

}
?>;

バッテリーデータを取得するのは、こんな感じで調整した。

print ($module['battery_vp'])."\n";

netatmo.shでデータ取得
netatmo.sh

#!/bin/sh

cd /usr/share/cacti/site/scripts/netatmo-api/bin
/usr/bin/php ./netatmo.php &gt;/tmp/netatmo.data

indoor=`cat /tmp/netatmo.data |sed  -e '11,11!d'|cut -d' ' -f2`
outdoor=`cat /tmp/netatmo.data |sed  -e '29,29!d'|cut -d' ' -f2`
indoorh=`cat /tmp/netatmo.data |sed  -e '45,45!d'|cut -d' ' -f2`
outdoorh=`cat /tmp/netatmo.data |sed  -e '63,63!d'|cut -d' ' -f2`

printf ' Indoor:'$indoor
printf ' Outdoor:'$outdoor
printf ' Indoorh:'$indoorh
printf ' Outdoorh:'$outdoorh

rm /tmp/netatmo.data

exit 0

netatmo-api-python

netatmo.py

#!/usr/bin/python3
# encoding=utf-8

# 2013-01 : philippelt@users.sourceforge.net 

# Just connect to a Netatmo account, and print internal and external temperature of the default (or single) station
# In this case, sensors of the station and the external module have been named 'internal' and 'external' in the
# Account station settings.

import lnetatmo

authorization = lnetatmo.ClientAuth()
devList = lnetatmo.DeviceList(authorization)

#print ("Current temperature (inside/outside/battry): %s / %s °C" %
#        ( devList.lastData()['Indoor']['Temperature'],
#          devList.lastData()['Outdoor']['Temperature']),
#         devList.lastData()['Outdoor']['battery_vp']
#)

print   "Inndoor:",devList.lastData()['Indoor']['Temperature']
print   "Outdoor:",devList.lastData()['Outdoor']['Temperature']
print   "Battery:",devList.lastData()['Outdoor']['battery_vp']

#print('External module battery : ', "OK" if int(devList.lastData()['Outdoor']['battery_vp']) &gt; 5000 else "0" )

netatmo.sh

cd /usr/share/cacti/site/scripts/
python netatmo.py &gt; /tmp/netatmo

indoor=`cat /tmp/netatmo|grep Inndoor|cut -b10-`
outdoor=`cat /tmp/netatmo|grep Outdoor|cut -b10-`
batt=`cat /tmp/netatmo|grep Battery|cut -b10-`

printf ' Indoor:'$indoor
printf ' Outdoor:'$outdoor
printf ' Battery:'$batt

rm /tmp/netatmo

exit 0

上に書いたソースを元に試行錯誤の結果このようなグラフで妥協した。
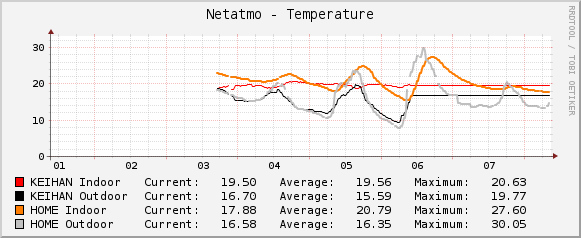
graph_image

温度データは取得出来ているのだが、グラフが結構途切れてしまう。