raspi:MineCraft pi

raspiには、minecraft pi をいう機能制限版のMineCraftがインストールされています。されていなければ、インストールすることもできます。

$ sudo apt-get update
$ sudo apt-get install minecraft-pi

デスクトップの “Menu – Games” にMinecraft Piが入ってますので、起動してみます。

起動できれば、terminalからpython2を起動します。
コードは、全てpython2で実行します。

Hello worldをスクリーンに表示

from mcpi import minecraft
mc = minecraft.Minecraft.create()
mc.postToChat("Hello world")

自分がどこにいるか調べる

pos=mc.player.getPos()

テレポート
自分の位置の空中100のところにテレポート

x, y, z = mc.player.getPos()
mc.player.setPos(x, y+100, z)

ブロックを置く
自分が立っている場所の隣に石のブロックを置く
構文:mc.setBlock(x, y, z, id)
idは、空気:0 , 草:2 , 土:3
他にもidがあるのかな?

x, y, z = mc.player.getPos()
mc.setBlock(x+1, y, z, 1)

変数としてのブロック
idを変数に格納して利用できる

dart=block.DART.id
mc.setBlock(x, y, z, dart)

idがわかっている場合
dart=3
mc.setBlock(x, y, z, dart)

特殊なブロック
色を付けることが出来る特殊なブロックがある。例えば、”wool”
これは、追加のプロパティをもっています。
設定するには、4つ目のパタメータを使う。
0:白 . 1:オレンジ . 2:マゼンダ , 3:ライトブルー , 4:黄色

wool=35
mc.setBlock(x, y, z, wool,1)

複数のブロックを置く
setBlockで1つのブロックを置くのと同じように、setBlocksで複数置くことが出来る

stone=1
x, y, z = mc.player.getPos()
mc.setBlocks(x+1, y+1, z+1, x+11, y+11, z+11, stone)

これらを利用して、命令を組み合わせると、自分が歩いたところにブロックを置くことも出来る。

from mcpi import minecraft
from time import sleep

mc = minecraft.Minecraft.create()

flower = 38

while True:
    x, y, z = mc.player.getPos()
    mc.setBlock(x, y, z, flower)
    sleep(0.1)

while True: を利用したので、永遠に花を置いていきます。Pythonウインドウで”Ctrl + c”を押すと止められます。

ある特定のブロックの歩いている時だけ、花を落とすには、
getBlockを使い、ブロックの種類を判定しながら、ブロックを配置する命令を記述します。

x, y, z = mc.player.getPos()  # プレイヤーの位置 (x, y, z)
this_block = mc.getBlock(x, y, z)  # ブロックのID
print(this_block)
while True:
    x, y, z = mc.player.getPos()
    block_beneath = mc.getBlock(x, y-1, z)
    print(block_beneath)
grass = 2
flower = 38

while True:
    x, y, z = mc.player.getPos()  # プレイヤーの位置 (x, y, z)
    block_beneath = mc.getBlock(x, y-1, z)  # ブロックのID

    if block_beneath == grass:
        mc.setBlock(x, y, z, flower)
    sleep(0.1)

自分が立っているところが草じゃ無ければ、草に変えるには、このよう変更すればいい。

while True:
    x, y, z = mc.player.getPos()  # プレイヤーの位置 (x, y, z)
    block_beneath = mc.getBlock(x, y-1, z)  # ブロックのID

    if block_beneath == grass:
        mc.setBlock(x, y, z, flower)
    sleep(0.1)

TNTブロック
TNTブロックを置くには、このようにすればよいが、爆発しません。

tnt = 46
mc.setBlock(x, y, z, tnt)

爆発するブロックを置くには、tntのあとに、” ,1″を付けます。

tnt = 46
mc.setBlock(x, y, z, tnt, 1)

TNTブロックのビルを作って爆発させてみる。

tnt = 46
mc.setBlocks(x+1, y+1, z+1, x+11, y+11, z+11, tnt, 1)

基礎的なことは、この程度です。
ブロックの種類や色など他にも色々あるようですから、詳しくは、APIリファレンスを見よう。
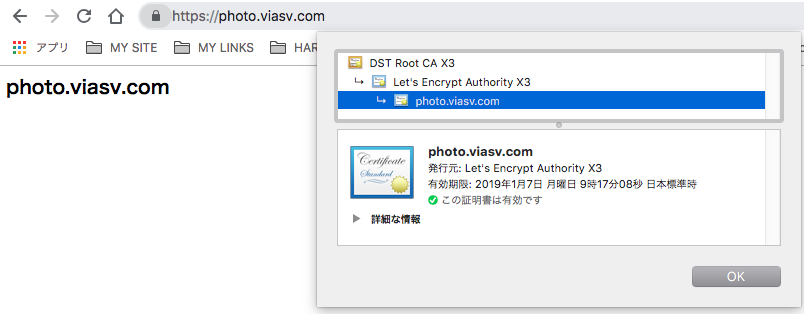
raspi:certbot – nginx

Let’s encryptを使い証明書を取得します。

apache2でもnginxでも証明書を作成する手順は変わらない。

photo.viasv.comの名前解決が出来るよう、DNSを設定しnslookupなどで解決できているか確認します。

確認出来れば、作業を開始する。

最初に、photo.viasv.comを公開するディレクトリを作成

mkdir /var/www/html/photo
chown www-data:www-data /var/www/html/photo

ls -la /var/www/html/
total 48
drwxr-xr-x 5 root     www-data  4096 Oct  9 08:59 .
drwxr-xr-x 3 root     root      4096 Sep 27 14:30 ..
drwxr-xr-x 2 www-data www-data  4096 Oct  9 08:59 photo

nginxのVirtualHostの設定を行い、https://photo.viasv.com/を表示出来るか確認する。最初は、sslの設定はコメントアウトしておく。

server {
        listen 443 ssl;
        listen [::]:443 ssl;

        server_name photo.viasv.com;

        root /var/www/html/photo;
#        ssl_certificate /etc/letsencrypt/live/photo.viasv.com/fullchain.pem;
#        ssl_certificate_key /etc/letsencrypt/live/photo.viasv.com/privkey.pem;
#       ssl_protocols TLSv1 TLSv1.1 TLSv1.2;

        index index.html index.htm index.php index.nginx-debian.html;

        location ~ \.php$ {
        include snippets/fastcgi-php.conf;
        fastcgi_pass unix:/var/run/php/php7.0-fpm.sock;
        include         fastcgi_params;
        }

        location / {
                try_files $uri $uri/ =404;
        }
}

nginxの設定が終われば、再起動する。

$ sudo service nginx restart

きちんと、表示出来れば、certbotを使い、証明書を取得する。

certbot certonly --webroot -w /var/www/html/photo -d photo.viasv.com
Saving debug log to /var/log/letsencrypt/letsencrypt.log
Obtaining a new certificate
An unexpected error occurred:
There were too many requests of a given type :: Error creating new authz :: too many failed authorizations recently: see https://letsencrypt.org/docs/rate-limits/
Please see the logfiles in /var/log/letsencrypt for more details.
root@ras:/var/www/html/photo/.well-known# certbot certonly --webroot -w /var/www/html/photo -d photo.viasv.com
Saving debug log to /var/log/letsencrypt/letsencrypt.log
Obtaining a new certificate
Performing the following challenges:
http-01 challenge for photo.viasv.com
Using the webroot path /var/www/html/photo for all unmatched domains.
Waiting for verification...
Cleaning up challenges
Generating key (2048 bits): /etc/letsencrypt/keys/0002_key-certbot.pem
Creating CSR: /etc/letsencrypt/csr/0002_csr-certbot.pem

IMPORTANT NOTES:
 - Congratulations! Your certificate and chain have been saved at
   /etc/letsencrypt/live/photo.viasv.com/fullchain.pem. Your cert will
   expire on 2019-01-07. To obtain a new or tweaked version of this
   certificate in the future, simply run certbot again. To
   non-interactively renew *all* of your certificates, run "certbot
   renew"
 - If you like Certbot, please consider supporting our work by:

   Donating to ISRG / Let's Encrypt:   https://letsencrypt.org/donate
   Donating to EFF:                    https://eff.org/donate-le

証明書を確認する。

$ ls /etc/letsencrypt/live/photo.viasv.com/
cert.pem  chain.pem  fullchain.pem  privkey.pem  README

証明書がきちんと出来ていることを確認出来れば、nginxの設定でsslのコメントを外し、nginxを再起動する。

cert.pem 証明書
privkey.pem 秘密鍵
chain.pem 中間証明書
fullchain.pem 証明書+中間証明書(結合したもの)

raspi:nginx

apacheを使ってhttpsを設定・運用していたが、なにか設定を触った時に、http+let’s encryptで使っている鍵が合わないと表示されapacheが起動しなくなっていた。certbotで鍵を作り替えたり、apacheの設定を見直してみたが、原因わからず、結局web serverをapache2からnginxに切り替えることにした。

apache2の自動起動を止める。

# systemctl disable apache2

nginxをinstall

$ sudo apt-get install nginx

設定する。
sslはcertbotで作成済みなので、流用する。

vi /etc/nginx/sites-enabled/default
server {
        listen 443 ssl;
        listen [::]:443 ssl;
        server_name domain_name;
        root /var/www/html;
        ssl_certificate /etc/letsencrypt/live/domain_name/fullchain.pem;
        ssl_certificate_key /etc/letsencrypt/live/domain_name/privkey.pem;
        index index.html index.htm index.php index.nginx-debian.html;

        ssl_protocols TLSv1 TLSv1.1 TLSv1.2;

        location ~ \.php$ {
        include snippets/fastcgi-php.conf;
        fastcgi_pass unix:/var/run/php/php7.0-fpm.sock;
        include         fastcgi_params;
        }

        location / {
                try_files $uri $uri/ =404;
        }
}

nginxを再起動

$ sudo service nginx restart

raspi:rpi-update

raspberry piのFirmwareを最新版に更新してみます。

現状の確認後、aptを使ってシステムを更新します。

$ uname -a

Linux ras2 4.14.70-v7+ #1144 SMP Tue Sep 18 17:34:46 BST 2018 armv7l GNU/Linux

$ sudo apt-get update

[sudo] kaz のパスワード:
ヒット:1 http://archive.raspberrypi.org/debian stretch InRelease
取得:2 http://raspbian.raspberrypi.org/raspbian stretch InRelease [15.0 kB]
15.0 kB を 2秒 で取得しました (5,685 B/s)
パッケージリストを読み込んでいます… 完了
$ sudo apt-get upgrade
パッケージリストを読み込んでいます… 完了
依存関係ツリーを作成しています
状態情報を読み取っています… 完了
アップグレードパッケージを検出しています… 完了
以下のパッケージはアップグレードされます:
libfm-data libfm-extra4 libfm-gtk-data libfm-gtk4 libfm-modules libfm4 python-unicornhathd
python3-unicornhathd
アップグレード: 8 個、新規インストール: 0 個、削除: 0 個、保留: 0 個。
592 kB のアーカイブを取得する必要があります。
この操作後に追加で 15.4 kB のディスク容量が消費されます。
続行しますか? [Y/n] y
取得:1 http://archive.raspberrypi.org/debian stretch/ui armhf libfm-data all 1.2.5-1+rpi6 [234 kB]
取得:2 http://archive.raspberrypi.org/debian stretch/ui armhf libfm-extra4 armhf 1.2.5-1+rpi6 [29.4 kB]
取得:3 http://archive.raspberrypi.org/debian stretch/ui armhf libfm-gtk-data all 1.2.5-1+rpi6 [34.1 kB]
取得:4 http://archive.raspberrypi.org/debian stretch/ui armhf libfm-gtk4 armhf 1.2.5-1+rpi6 [134 kB]
取得:5 http://archive.raspberrypi.org/debian stretch/ui armhf libfm4 armhf 1.2.5-1+rpi6 [101 kB]
取得:6 http://archive.raspberrypi.org/debian stretch/ui armhf libfm-modules armhf 1.2.5-1+rpi6 [45.9 kB]
取得:7 http://archive.raspberrypi.org/debian stretch/main armhf python-unicornhathd all 0.0.4 [6,428 B]
取得:8 http://archive.raspberrypi.org/debian stretch/main armhf python3-unicornhathd all 0.0.4 [6,504 B]
592 kB を 2秒 で取得しました (291 kB/s)
changelog を読んでいます… 完了
(データベースを読み込んでいます … 現在 117874 個のファイルとディレクトリがインストールされています。)
…/0-libfm-data_1.2.5-1+rpi6_all.deb を展開する準備をしています …
libfm-data (1.2.5-1+rpi6) で (1.2.5-1+rpi5 に) 上書き展開しています …
…/1-libfm-extra4_1.2.5-1+rpi6_armhf.deb を展開する準備をしています …
libfm-extra4:armhf (1.2.5-1+rpi6) で (1.2.5-1+rpi5 に) 上書き展開しています …
…/2-libfm-gtk-data_1.2.5-1+rpi6_all.deb を展開する準備をしています …
libfm-gtk-data (1.2.5-1+rpi6) で (1.2.5-1+rpi5 に) 上書き展開しています …
…/3-libfm-gtk4_1.2.5-1+rpi6_armhf.deb を展開する準備をしています …
libfm-gtk4:armhf (1.2.5-1+rpi6) で (1.2.5-1+rpi5 に) 上書き展開しています …
…/4-libfm4_1.2.5-1+rpi6_armhf.deb を展開する準備をしています …
libfm4:armhf (1.2.5-1+rpi6) で (1.2.5-1+rpi5 に) 上書き展開しています …
…/5-libfm-modules_1.2.5-1+rpi6_armhf.deb を展開する準備をしています …
libfm-modules:armhf (1.2.5-1+rpi6) で (1.2.5-1+rpi5 に) 上書き展開しています …
…/6-python-unicornhathd_0.0.4_all.deb を展開する準備をしています …
python-unicornhathd (0.0.4) で (0.0.3 に) 上書き展開しています …
…/7-python3-unicornhathd_0.0.4_all.deb を展開する準備をしています …
python3-unicornhathd (0.0.4) で (0.0.3 に) 上書き展開しています …
python3-unicornhathd (0.0.4) を設定しています …
libfm-data (1.2.5-1+rpi6) を設定しています …
libfm-extra4:armhf (1.2.5-1+rpi6) を設定しています …
libc-bin (2.24-11+deb9u3) のトリガを処理しています …
python-unicornhathd (0.0.4) を設定しています …
libfm-gtk-data (1.2.5-1+rpi6) を設定しています …
shared-mime-info (1.8-1+deb9u1) のトリガを処理しています …
libfm4:armhf (1.2.5-1+rpi6) を設定しています …
libfm-gtk4:armhf (1.2.5-1+rpi6) を設定しています …
libfm-modules:armhf (1.2.5-1+rpi6) を設定しています …
libc-bin (2.24-11+deb9u3) のトリガを処理しています …

$ sudo apt-get dist-upgrade

パッケージリストを読み込んでいます… 完了
依存関係ツリーを作成しています
状態情報を読み取っています… 完了
アップグレードパッケージを検出しています… 完了
アップグレード: 0 個、新規インストール: 0 個、削除: 0 個、保留: 0 個。

次に、rpi-updateを行います。

$ sudo rpi-update

*** Raspberry Pi firmware updater by Hexxeh, enhanced by AndrewS and Dom
*** Performing self-update
% Total % Received % Xferd Average Speed Time Time Time Current
Dload Upload Total Spent Left Speed
100 13545 100 13545 0 0 30329 0 –:–:– –:–:– –:–:– 30369
*** Relaunching after update
*** Raspberry Pi firmware updater by Hexxeh, enhanced by AndrewS and Dom
*** We’re running for the first time
*** Backing up files (this will take a few minutes)
*** Backing up firmware
*** Backing up modules 4.14.70-v7+
#############################################################
This update bumps to rpi-4.14.y linux tree
Be aware there could be compatibility issues with some drivers
Discussion here:
https://www.raspberrypi.org/forums/viewtopic.php?f=29&t=197689
##############################################################
*** Downloading specific firmware revision (this will take a few minutes)
% Total % Received % Xferd Average Speed Time Time Time Current
Dload Upload Total Spent Left Speed
100 168 0 168 0 0 187 0 –:–:– –:–:– –:–:– 188
100 56.1M 100 56.1M 0 0 2740k 0 0:00:20 0:00:20 –:–:– 2060k
*** Updating firmware
*** Updating kernel modules
*** depmod 4.14.73+
*** depmod 4.14.73-v7+
*** Updating VideoCore libraries
*** Using HardFP libraries
*** Updating SDK
*** Running ldconfig
*** Storing current firmware revision
*** Deleting downloaded files
*** Syncing changes to disk
*** If no errors appeared, your firmware was successfully updated to 9f230923e419d942cf02fe936ea4fd186d3a21fa
*** A reboot is needed to activate the new firmware

うまくいったようで、再起動すると、New Firmwareで起動します。

再起動後、確認

Linux ras2 4.14.73-v7+ #1148 SMP Mon Oct 1 16:57:50 BST 2018 armv7l

The programs included with the Debian GNU/Linux system are free software;
the exact distribution terms for each program are described in the
individual files in /usr/share/doc/*/copyright.

Debian GNU/Linux comes with ABSOLUTELY NO WARRANTY, to the extent
permitted by applicable law.

(旧)Linux ras2 4.14.70-v7+ #1144 SMP Tue Sep 18 17:34:46 BST 2018 armv7l GNU/Linux

(新)Linux ras2 4.14.73-v7+ #1148 SMP Mon Oct 1 16:57:50 BST 2018 armv7l GNU/Linux

kernelが変わっています。

raspi:squid SSL Bump

残念ながら、未だに稼働させる事が出来ておりません。2018/10/9

https://plaza.rakuten.co.jp/tshinoza/diary/201710130000/?scid=we_blg_pc_lastctgy_2_title

こちらにも参考になる事が書いてあったので、メモしておく。

鍵の変換について

https://rms-digicert.ne.jp/howto/basis/file_types.html

pem→der

openssl x509 -in [input_file] -inform PEM -out [output_file] -outform DER

作っておく

openssl x509 -in cert.pem -inform PEM -out cert.der -outform DER

Squidで通過型Proxyを建てたが、https通信の中を見ることが出来ず、Proxyで判別することが出来ない。

SSL Bumpを利用すると、Squidの内部で暗号を解除し、中身を見た後に、再度SSLをかけるような処理をすると、httpsのアクセスでもproxy処理することが出来る。

外部に向けてSquid SSL Bumpを使うと、httpsであっても、アクセス解析が可能となるので、注意が必要になる。
今回は、内部のNetworkのみからアクセス可能としているので、その点は問題無いと思う。

raspbianのsquidはSSL Bumpに対応していないので、sourceからbuildする。

sourceを入手出来るよう、sources.listを変更する。

# vi /etc/apt/sources.list
deb http://raspbian.raspberrypi.org/raspbian/ stretch main contrib non-free rpi
# Uncomment line below then 'apt-get update' to enable 'apt-get source'
deb-src http://raspbian.raspberrypi.org/raspbian/ stretch main contrib non-free rpi

変更したら、apt-get updateする。

# apt-get update

Buildに必要になりそうなものをinstallする。

# apt install devscripts build-essential fakeroot libssl-dev libldap2-dev libpam0g-dev libdb-dev cdbs libsasl2-dev debhelper libcppunit-dev libkrb5-dev comerr-dev libcap-dev

rootから出る。
$ cd ~
$ mkdir squid-source
$ cd squid-source
$ apt-get source squid3
$ cd squid3-3.5.23/
$ vi debian/rules
DEB_CONFIGURE_EXTRA_FLAGS に option を追加する。
                --with-large-files \
                --with-openssl \
                --enable-ssl \
                --enable-ssl-crtd \
                --with-default-user=proxy

あとは、configureしてbuildする。

$ pwd
/home/username/squid-source/squid3-3.5.23
$ ./configure
$ debuild -us -uc -b
 dpkg-buildpackage -rfakeroot -us -uc
dpkg-buildpackage: info: source package squid3
dpkg-buildpackage: info: source version 3.5.23-5+deb9u1
dpkg-buildpackage: info: source distribution stretch-security
dpkg-buildpackage: info: source changed by Salvatore Bonaccorso <carnil@debian.org>
 dpkg-source --before-build squid3-3.5.23
dpkg-buildpackage: info: host architecture armhf
dpkg-checkbuilddeps: error: Unmet build dependencies: libecap3-dev (>= 1.0.1-2) libexpat1-dev libxml2-dev libnetfilter-conntrack-dev nettle-dev libgnutls28-dev
dpkg-buildpackage: warning: build dependencies/conflicts unsatisfied; aborting
dpkg-buildpackage: warning: (Use -d flag to override.)
debuild: fatal error at line 1116:
dpkg-buildpackage -rfakeroot -us -uc failed

packageが足らないらしい。

dpkg-checkbuilddeps: error: Unmet build dependencies: libecap3-dev (>= 1.0.1-2) libexpat1-dev libxml2-dev libnetfilter-conntrack-dev nettle-dev libgnutls28-dev

aptで入れる。

$ sudo apt-get install libexpat1-dev libxml2-dev libnetfilter-conntrack-dev nettle-dev libgnutls28-dev

これで、Buildする環境が整いました。

$ debuild -us -uc -b

makeするのにかなり時間が必要なるので、じっくり待つことにする。
待っている間に、apt-get でinstallしたsquidのバージョンを調べておく。

$ apt-cache policy squid
squid:
  Installed: 3.5.23-5+deb9u1
  Candidate: 3.5.23-5+deb9u1
  Version table:
 *** 3.5.23-5+deb9u1 500
        500 http://raspbian.raspberrypi.org/raspbian stretch/main armhf Packages
        100 /var/lib/dpkg/status
$ dpkg -l |grep squid
ii  squid                            3.5.23-5+deb9u1              armhf        Full featured Web Proxy cache (HTTP proxy)
ii  squid-common                     3.5.23-5+deb9u1              all          Full featured Web Proxy cache (HTTP proxy) - common files
ii  squid-langpack                   20150704-1                   all          Localized error pages for Squid

やっぱり、makeしているのと同じバージョンです。
squid本体だけ更新すればよいみたい。

makeしている途中で、エラーを吐いてしまっていた。

Makefile:796: recipe for target 'PortCfg.lo' failed
make[4]: *** [PortCfg.lo] Error 1
make[4]: Leaving directory '/home/kaz/squid-source/squid3-3.5.23/src/anyp'
Makefile:7291: recipe for target 'all-recursive' failed
make[3]: *** [all-recursive] Error 1
make[3]: Leaving directory '/home/kaz/squid-source/squid3-3.5.23/src'
Makefile:6152: recipe for target 'all' failed
make[2]: *** [all] Error 2
make[2]: Leaving directory '/home/kaz/squid-source/squid3-3.5.23/src'

調べてみると、

http://squid-web-proxy-cache.1019090.n4.nabble.com/Build-errors-with-Squid-3-5-24-under-Debian-td4681637.html

「Squid 3.5はOpenSSL v1.1に対応していないのが原因」らしいので、先人の知恵を借りて、

sudo apt-get install libssl1.0-dev

でもって、再buildする。

$ debuild -us -uc -b

makeを待っている間に、squid.confの修正箇所を確認しておこう。
httpsにするわけだから、鍵が必要です。
proftpdと同じく、Let’s Encryptで作成した鍵を流用する。どの鍵を使うかわからなかったので、とりあえず、後でオレオレ証明書を作成する事にする。
confのバックアップもしておこう。

$ sudo cp squid.conf squid.conf-http_only
$ vi /etc/squid.conf
http_port 3128 intercept
https_port 3129 intercept ssl-bump generate-host-certificates=on dynamic_cert_mem_cache_size=4MB cert=/etc/squid/ssl/cacert.pem key=/etc/squid/ssl/caprivatekey.pem

always_direct allow all

acl step1 at_step SslBump1
acl step2 at_step SslBump2
acl nobumpSites ssl::server_name [hostname]
ssl_bump peek step1 
ssl_bump splice step2 nobumpSites
ssl_bump bump all

sslcrtd_program /usr/lib/squid3/ssl_crtd -s /var/lib/ssl_db -M 4MB

#http_port 3128
http_port 3128 intercept
https_port 3129 intercept ssl-bump generate-host-certificates=on dynamic_cert_mem_cache_size=4MB cert=/etc/letsencrypt/live/ras.viasv.com/cacert.pem key=/etc/letsencrypt/live/ras.viasv.com/privkey.pem

always_direct allow all

acl step1 at_step SslBump1
acl step2 at_step SslBump2
acl nobumpSites ssl::server_name [hostname]
ssl_bump peek step1
ssl_bump splice step2 nobumpSites
ssl_bump bump all

sslcrtd_program /usr/lib/squid3/ssl_crtd -s /var/lib/ssl_db -M 4MB

request_header_access X-Forwarded-For deny all
request_header_access Via deny all
request_header_access Cache-Control deny all
reply_header_access X-Forwarded-For deny all
reply_header_access Via deny all
reply_header_access Cache-Control deny all

forwarded_for off
via off

ようやくBuildが終わった。Build始めてから5時間以上かかった計算だ。昔のマシンでkernel makeに12時間係ったことを思えば早いくらいだ。
出来上がったファイルは、たくさんある。5時間以上かかったので、バックアップでWEB上に上げておこう。

FILES MD5 CheckSum

squid-cgi_3.5.23-5+deb9u1_armhf.deb

d96d5240cd3a61683bc780cdf8887d5f
squid-common_3.5.23-5+deb9u1_all.deb c0faf3cbf4b5c6f1a2073f70ab44a28e
squid-dbg_3.5.23-5+deb9u1_armhf.deb
 22515b9967131a82190098fa9478e2e2
squid-purge_3.5.23-5+deb9u1_armhf.deb
e58a041efa8e2af2a499c5f04ce87602
squid_3.5.23-5+deb9u1_armhf.deb
4cc9b0a305517186dc741e658f64ed53
squidclient_3.5.23-5+deb9u1_armhf.deb 
fbce9256db550da79d45c5282ef14575

Download

愚痴はこれくらいにして、自分でBuildしたとはいえ、インストールしてどうなるかわからないので、インストール前に挙動の確認を行う。

$ sudo dpkg --no-act squid3_3.5.23-5+deb9u1_all.deb

問題なさそうなので、インストールする。

$ sudo dpkg -i squid_3.5.23-5+deb9u1_amd64.deb

squid.confの書き方が間違っていると思う。起動しないw
squid用にオレオレ証明書を作成する。

https://webnetforce.net/strongswan-ikev2-on-sakura-vps/

ipsecが使えるように、strongswanをインストール
後々ipsecを導入するかもしれないからとりあえず、一式作成しておく

$ sudo apt-get install strongswan strongswan-pki

鍵を作っていく

$ ipsec pki --gen --type rsa --size 4096 --outform der > caprivatekey.der
$ ipsec pki --self --ca --lifetime 3650 --in caprivatekey.der --type rsa --dn "C=JP, O=Kyoto, CN=Kyoto" --outform der > cacert.der

証明書の確認

$ ipsec pki --print --in cacert.der
  subject:  "C=JP, O=Kyoto, CN=Kyoto"
  issuer:   "C=JP, O=Kyoto, CN=Kyoto"
  validity:  not before Oct 04 23:30:49 2018, ok
             not after  Oct 01 23:30:49 2028, ok (expires in 3649 days)
  serial:    *****
  flags:     CA CRLSign self-signed 
  subjkeyId: *****
  pubkey:    RSA 4096 bits
  keyid:     *****
  subjkey:   *****

サーバー証明書

$ ipsec pki --gen --type rsa --size 4096 --outform der > serverkey.der
$ ipsec pki --pub --in serverkey.der --type rsa | ipsec pki --issue --lifetime 3650 --cacert cacert.der --cakey caprivatekey.der --dn "C=JP, O=Kyoto, CN=Kyoto" --san viasv --san @viasv --flag serverAuth --flag ikeIntermediate --outform der > servercert.der

クライアント証明書

$ ipsec pki --gen --type rsa --size 4096 --outform pem > client.pem
$ ipsec pki --pub --in client.pem --type rsa |
ipsec pki --issue --lifetime 3650 --cacert cacert.der --cakey caprivatekey.der --dn "C=JP, O=Kyoto, CN=client@viasav" --san client@Kyoto --outform pem > clientcert.pem
$ openssl x509 -inform DER -in cacert.der -out cacert.pem -outform PEM
$ openssl pkcs12 -export -inkey client.pem -in clientcert.pem -name "Client Certificarte" -certfile cacert.pem -caname "CA Certificate" -out viasv.p12
$ openssl rsa -in caprivatekey.der -inform der -out caprivatekey.pem

Buildしてdpkg -i して、conf書換、鍵の生成がおわり、起動してみる。

$ sudo service squid start

エラーが表示されなければ、うまく起動できている。
確認してみよう。

$ journalctl -xe
-- Unit squid.service has begun starting up.
Oct 05 00:09:57 ras squid[2656]: Starting Squid HTTP Proxy: squid2018/10/05 00:09:57| refreshAddToList: Unknown option '\.(gif|png|jpg|jpeg|ico)$': ignore-expire
Oct 05 00:09:57 ras squid[2656]: 2018/10/05 00:09:57| refreshAddToList: Unknown option '\.(iso|avi|wav|mp3|mp4|mpeg|swf|flv|x-flv)$': ignore-expire
Oct 05 00:09:57 ras squid[2656]: 2018/10/05 00:09:57| refreshAddToList: Unknown option '\.(deb|rpm|exe|zip|tar|tgz|ram|rar|bin|ppt|doc|tiff)$': ignore-expire
Oct 05 00:09:57 ras squid[2656]: 2018/10/05 00:09:57| ERROR: Directive 'upgrade_http0.9' is obsolete.
Oct 05 00:09:57 ras squid[2656]: 2018/10/05 00:09:57| ERROR: Directive 'broken_vary_encoding' is obsolete.
Oct 05 00:09:57 ras squid[2656]: 2018/10/05 00:09:57| ERROR: Directive 'extension_methods' is obsolete.
Oct 05 00:09:57 ras squid[2656]: 2018/10/05 00:09:57| ERROR: Directive 'hierarchy_stoplist' is obsolete.
Oct 05 00:09:58 ras squid[2695]: Squid Parent: will start 1 kids
Oct 05 00:09:58 ras squid[2695]: Squid Parent: (squid-1) process 2697 started
Oct 05 00:09:58 ras squid[2656]: .
Oct 05 00:09:58 ras systemd[1]: squid.service: PID file /var/run/squid.pid not readable (yet?) after start: No such file or directory
Oct 05 00:10:00 ras systemd[1]: squid.service: Supervising process 2697 which is not our child. We'll most likely not notice when it exits.
Oct 05 00:10:00 ras systemd[1]: Started LSB: Squid HTTP Proxy version 3.x.
-- Subject: Unit squid.service has finished start-up
-- Defined-By: systemd
-- Support: https://www.debian.org/support
-- 
-- Unit squid.service has finished starting up.
-- 
-- The start-up result is done.

いくつかエラーが出ているようだ。後で調べてみる。