Raspberry Pi 2にRaspbianOSをインストール
普段使っているマシンは、MacなのでMacから作業を開始
https://www.raspberrypi.org/からOSイメージをダウンロード
今回使用するのは、RASPBIAN(Debian Wheezy)とする。
MicroSDをMacで認識させる。
diskutilコマンド等などでマウント場所を確認
$ diskutil list
/dev/disk5
#: TYPE          NAME          SIZE     IDENTIFIER
0: FDisk_partition_scheme     *31.2 GB  disk5
1: Windows_FAT_32 NO NAME      31.2 GB  disk5s1
通常FAT形式なのでAutomountされてしまいますので、ディスクユーティリティでdisk5s1をアンマウントします。
念のためパーティションを開放します。 1パーティションにして、フォーマットはしない設定とした。
確認してみる。
$ diskutil list
/dev/disk5
/dev/disk5
#: TYPE          NAME          SIZE     IDENTIFIER
0:                            *31.2 GB  disk5
1パーティションに変更されているのを確認後、OSを書き込みます。
$ sudo dd bs=1m if=/Users/UserID/raspi/2015-02-16-raspbian-wheezy.img of=/dev/disk5
3125+0 records in 3125+0 records out 3276800000 bytes transferred in 1758.568843 secs (1863333 bytes/sec)
real 29m24.156s
user 0m0.018s
sys 0m32.118s
書込には30分ほどかかりました。
OS起動
焼き終われば、raspi2にセットし給電用USBケーブル刺して起動する。電源ON/OFFないのねw
IP ADDRESSの設定
起動後、ssh や ディスプレイを接続しているなら、コンソールからraspi-configで各種設定とnetworkの設定(/etc/network/interface)を行う。 defaultのinterface設定はdhcpdで割り当てられているため、固定IPを割り振る。
#iface eth0 inet dhcp
auto eth0
iface eth0 inet
static address 192.168.x.xxx
netmask 255.255.255.0
network 192.168.x.255
broadcast 192.168.x.255
gateway 192.168.x.254
IP ADDRESSまで設定できれば、後はモニタもキーボードも何もいらないです。 sshで接続し、apt-getを使って環境を最新にします。
dhcpdのログを見てIP ADDRESSを確認し、sshでログインします。
default ID/PASSWORD は pi:raspberry
ログインすると
Linux raspberrypi 3.18.7-v7+ #755 SMP PREEMPT Thu Feb 12 17:20:48 GMT 2015 armv7l
The programs included with the Debian GNU/Linux system are free software;
the exact distribution terms for each program are described in the
individual files in /usr/share/doc/*/copyright.
Debian GNU/Linux comes with ABSOLUTELY NO WARRANTY, to the extent
permitted by applicable law.
NOTICE: the software on this Raspberry Pi has not been fully configured. Please run 'sudo raspi-config'

pi@raspberrypi:~$
raspi-configでconfigureしなさいと。
rootパスワードの設定
$ sudo passwd
Enter new UNIX password:
Retype new UNIX password:
passwd: password updated successfully
# su -
# df -h
ファイルシス   サイズ  使用  残り 使用% マウント位置
rootfs         2.9G  2.4G 364M  87%  /
/dev/root      2.9G  2.4G 364M  87%  /
devtmpfs       460M     0 460M   0%  /dev
tmpfs           93M  208K  93M   1%  /run
tmpfs          5.0M     0 5.0M   0%  /run/lock
tmpfs          186M     0 186M   0%  /run/shm
/dev/mmcblk0p1  56M   15M  42M  26%  /boot
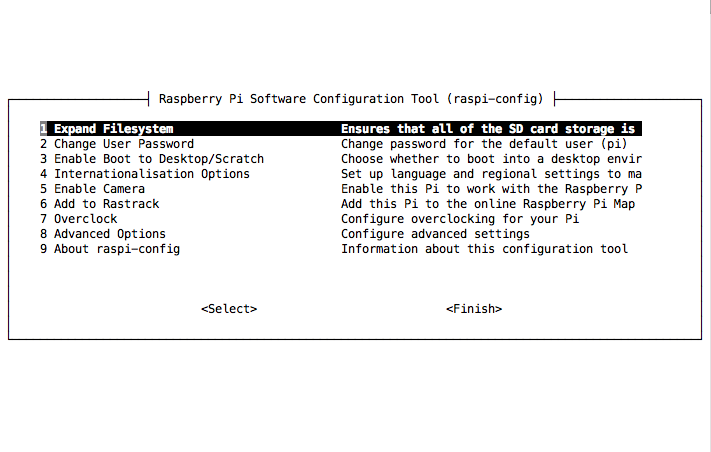
raspi-configでの設定
32GBのMicroSDなのに、rootが3GBしか利用してないので、raspi-configでrootを拡張します。
# raspi-config

- Expand Filesystemを選択すると、拡張します。
再起動を勧められますが、今は再起動せず、設定を一度に行う。
- Change User Passwordは「pi」のパスワード変更になる。
piは使わないつもりなので、設定しない。
- Enable Boot to Desktop/Scratchは、起動時にXを使うか、コンソールにするかの設定で、Xは使わないので、設定しない。
- Internationalisation OptionでTimezone等の設定を行う。
I1 Change Locale [*]ja_JP.UTF-8 UTF-8
I2 Change Timezone Asia-Tokyoを選択
I3 Keyboard 101を使っているので設定しない。localeを設定するときちんとターミナルでの表示が日本語になるんだねー

- Enable Cameraはカメラを使わないので、設定しない。
- Add to Rastrack 設置したマシンのトラッキングをするか?
しないので設定しない。
- Overclock 設定しない
- Advanced Options
A2 Hostname
A3 Memory Split 16
A7 I2C ON
の3項目のみ設定した。
ここで一度再起動する。
起動後、df -hを確認する。
$ df -h
ファイルシス     サイズ  使用  残り  使用% マウント位置
rootfs            29G  2.4G   25G    9% /
/dev/root         29G  2.4G   25G    9% /
devtmpfs         484M     0  484M    0% /dev
tmpfs             98M  204K   98M    1% /run
tmpfs            5.0M     0  5.0M    0% /run/lock
tmpfs            195M     0  195M    0% /run/shm
/dev/mmcblk0p1    56M   15M   42M   26% /boot</p>
ssh鍵認証を設定する。
$ scp host:/Users/UserID/ssh_keys.tgz .
$ tar xvf ssh_keys.tgz
$ cp id_dsa.pub authorized_keys
$ sudo vi /etc/ssh/sshd_config
PasswordAuthentication Yes
PasswordAuthentication no
鍵認証のみになったと思うので、sshdを再起動しておく。
漸くシステムのアップデートを開始
# apt-get update
# apt-get upgrade
RasPi2のファームをアップデート
RasPi2のファームと言っても、見た感じ Firmware , kernel , modules , library , SDK関係を更新しているみたいだ。
# less /usr/bin/rpi-update

# uname -a
Linux rastest 3.18.7-v7+ #755 SMP PREEMPT Thu Feb 12 17:20:48 GMT 2015 armv7l GNU/Linux

# rpi-update
*** Raspberry Pi firmware updater by Hexxeh, enhanced by AndrewS and Dom
*** Performing self-update
% Total % Received % Xferd Average Speed Time Time Time Current
Dload Upload Total Spent Left Speed
100 9823 100 9823 0 0 15285 0 --:--:-- --:--:-- --:--:-- 20170
*** Relaunching after update
*** Raspberry Pi firmware updater by Hexxeh, enhanced by AndrewS and Dom
*** We're running for the first time
*** Backing up files (this will take a few minutes)
*** Backing up firmware
*** Backing up modules 3.18.7-v7+
*** Downloading specific firmware revision (this will take a few minutes)
% Total % Received % Xferd Average Speed Time Time Time Current
Dload Upload Total Spent Left Speed
100 168 0 168 0 0 209 0 --:--:-- --:--:-- --:--:-- 277
100 46.1M 100 46.1M 0 0 2373k 0 0:00:19 0:00:19 --:--:-- 2062k
*** Updating firmware
*** Updating kernel modules
*** depmod 3.18.11-v7+
*** depmod 3.18.11+
*** Updating VideoCore libraries
*** Using HardFP libraries
*** Updating SDK
*** Running ldconfig
*** Storing current firmware revision
*** Deleting downloaded files
*** Syncing changes to disk
*** If no errors appeared, your firmware was successfully updated to 5b0cbedacf45e111f02d925fa5b1cec9041fb279
*** A reboot is needed to activate the new firmware

#reboot
再起動後kernel versionを確認する。
# uname -a
Linux rastest 3.18.11-v7+ #781 SMP PREEMPT Tue Apr 21 18:07:59 BST 2015 armv7l GNU/Linux
若干 kernel versionが上がりました。
ntpdの停止とntpdateをcronに登録する。
ntpdを起動していてもmemoryを消費するだけなので、cronにntpdateを設定して、時間あわせを行う。
# sudo update-rc.d ntpd remove
update-rc.d: using dependency based boot sequencing
ntpdを自動起動する場合は、
# sudo update-rc.d ntpd defaults
ntpdは利用しないので、アンインストールしてしまおう。
# apt-get remove --purge ntp
手動で時間あわせをしてみる。環境内にntpdを動かしているので、自前のntpdを利用する。
# ntpdate ntp-host
ntpdateが無いので、apt-getで突っこむ。
# apt-get install ntpdate
# ntpdate ntp-host
23 Apr 09:32:58 ntpdate[2587]: adjust time server ntp-host offset -0.489409 sec
手動で時間あわせが出来たので、crontabに仕込む。
# vi /etc/default/ntpdate
NTPSERVERS="ntp-host1 ntp-host2"
# crontal -l
45 * * * * /etc/network/if-up.d/ntpdate > /dev/null 2>&1
45分間隔で時刻合わせを行う。
とりあえず、環境は出来上がりました。


